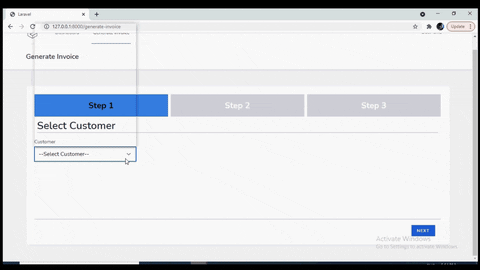
In this Tutorial, we will build a Multi Step Form from scratch using Livewire. We will Validate the Data on each Step before eventually saving it. At the end of the Tutorial, we will have a Multi Step Form which looks like below.
I am starting with Fresh Laravel Project with Livewire Installed. I have also installed Breeze which also installs TailwindCss. I have also set up a Route where we are going to display our Livewire Component.
We will build a Livewire Component which will allow Users to Create an Invoice. On the First step, we will allow user to select a Customer. On 2nd Step, we will allow user to enter Amount. And on the Final Step, User will add a Message for the Customer before finally saving it.
We can create the Livewire Component using the below Artisan Command.
php artisan make:livewire CreateInvoice
This will create our Livewire Component at app/Http/Livewire/CreateInvoice.php. We will define 2 Properties in this Component $step and $totalSteps and assign them a value of 1 and 3 respectively.
<?php

namespace App\Http\Livewire;
use Livewire\Component;

class CreateInvoice extends Component
{
    public $totalSteps = 3;
    public $step = 1;
We will use these 2 Properties to display the top Section of the Multi Step Wizard, which displays all the Steps and highlights the current step.
I have a component defined at resources/components/wizard-step.blade.php, which looks like below
@props(['active' => false])

<div class="@if($active) bg-blue-500 text-black @else bg-gray-300 text-white @endif flex items-center justify-center text-2xl font-extrabold">
    {{ $slot }}
</div>
Here we are using TailwindCss classes to display the Active Step with Blue Background. All the other Steps are displayed with Gray Background.
We can use this Component in our Livewire View to display the Top Section using $step and $totalSteps like below
@for ($i = 1; $i <= $totalSteps; $i++)
     <x-wizard-step :active="$i == $step">Step {{$i }}</x-wizard-step>
@endfor
Next we will work on the Bottom Section which displays the Navigation. Again we can display the Navigation using $step and $totalSteps
We will display the Previous Button unless we are on 1st Page.
@if($step != 1)
      <x-button class="ml-4" wire:click="moveBack">Previous</x-button>
 @endif
We will always display the Next Button. However if we are on Last Step, we will change its text to Submit.
<x-button class="mr-4" wire:click="moveAhead">
    {{$step != $totalSteps ? 'Next' : 'Submit' }}
</x-button>
We are using wire:click property so on the Click of Previous and Next button, we will call moveBack and moveAhead methods. Lets define these methods in our Livewire Component.
    public function moveBack()
    {
        $this->step -= 1;
    }

    public function moveAhead ()
    {
        $this->step -= 1;
    }
So on the Click of these buttons, we are simply changing the Value of $step. This will change the Top Section & Bottom Section accordingly as the User Navigates.
Now lets work on the Middle Section. The Middle Section will display the Actual Form Fields on each Step. In order to better manage the code, I will define the Fields for each Step in a different Blade File and display the appropriate Blade File depending on the current step, which is determined by $step.
@include('livewire.create-invoice.step' . $step)
This way you should have 3 files like step1, step2 and step3, where you can define all the relevant fields corresponding to those steps. This helps you to keep your code organize.
Now you must define all the fields that you will be using in these forms as the public property in the Livewire Component so that you can bind them using wire:model. And you must also define the Validation Rules for these Fields in your Component.
   //Fields to store
    public $customer_id = '';
    public $isFixed = true;
    public $amount = 0;
    public $hours = 0;
    public $rate = 0;
    public $calculatedAmount = 0;
    public $message = '';

    protected $rules = [
        'customer_id' => 'required',
        'isFixed' => 'required|boolean',
        'amount' => 'required|numeric|gt:0',
        'hours' => 'numeric|gt:0',
        'rate' => 'numeric|gt:0',
        'message' => 'required|min:20',
    ];
Now we don’t need to do anything else when User clicks on Back or Previous Button. However when User clicks on Next Button, we should do the following things:
- Validate the Data for the specific step.
- Save to Database if this is last step.
- Reset Error Bag for next Step.
- Increment the value of
$step
Turns out we are already doing the last step. In order to validate the data for the specific Step, we would use validateOnly method. If the validation fails, validateOnly method automatically stops the execution of the remaining function. So our code looks like below:
        switch($this->step) {
            case 1:
                //Validate Step 1 Data
                $this->validateOnly('customer_id');
                break;
            case 2:
                //Validate Step 2 Data
                $this->validateOnly('amount');
                $this->validateOnly('hours');
                $this->validateOnly('rate');
                break;
            case 3:
                //Validate Step 3 Data and insert to Database
                $this->validateOnly('message');
                //Insert to Database here and redirect.
                break;
        }

        //Wont reach here if the Validation Fails.
        $this->resetErrorBag();
        $this->step += 1;
This way we are able to Validate the Data and show error Message to Users at each step. If you have large number of fields or steps, you can also store this information in array and loop through that array to validate each Field depending upon the current step.
It is very easy to customize if you want to introduce a new field or a new step as well. At this stage you should have the same output as shown in the image at the start of the Tutorial.
If you are interested in the code, you can get it from Github.
Hope this article was helpful to you.