This uses an Older Version of Laravel and the steps might have changed since the article was published
With the rise of API Driven Development building a REST API for your application is a common practice. In this tutorial, we are going to learn creating a Restful API in Laravel Framework using JSON Web Token (JWT). Tutorial will provide you step by step guide on how to create a REST API.
All the Code is available at Github at the end of the tutorial.
The tutorial assumes that your working environment is already set up. You can use Linux as well as Windows to follow this tutorial. Let us dive into it straightaway.
Step 1: Open the Command Line and Install the Laravel. We are going to name our folder as laravel-jwt
$ laravel new laravel-jwt
This will install Laravel and all its dependencies.
Step 2: Create the DB for your app. You can use phpMyAdmin to create the DB
Step 3: Now we need to link the DB that we just created with our App. Go inside the newly created folder laravel-jwt and open the .env File in your editor. Update the DB_DATABASE, DB_USERNAME and DB_PASSWORD accordingly.
DB_DATABASE=laravel
DB_USERNAME=root
DB_PASSWORD=
Step 4: In the command line go inside the laravel-jwt Folder. Now we are going to create a Patient Model. We will expose this model to our REST API. We are going to use Artisan which is Laravel’s Command Line Tool to create this Model. Artisan helps us to generate Files and puts them in the correct folder. Use the following command to create Model.
php artisan make:model Patient --migration --resource --controller
Here we have asked Artisan to make a Model with name Patient. We have also specified a few extra Flags which tells Artisan to create Migration for this Model, create a Controller for this model and indicate that this controller should be resource controller.
You should see an output like below:
Model created successfully.
Created Migration: 2019_06_28_061806_create_patients_table
Controller created successfully.
You can check various options available using the following help command.
php artisan help make:model
You will see that Artisan has created following files:
- Patient.phpModel File inside /app/
- Controller File PatientController.php at /app/Http/Controllers/
- Migration File xxxx_xx_xx_xxxxxx_create_patients_table.php inside /database/migrations
There are already 2 other files inside the migrations folder. More on them later.
Step 5: Open the Migration File. We have a class with up() and down() methods.
up() method will be called when run the migration. down() method will be called when we rollback the migration.
So in the up() method we need to specify all the columns that `patients` table will have. We already have auto increment column as id. We also have $table->timestamps(), which will create created_at and updated_at columns. These columns will be automatically updated by Laravel. Let us add first_name, last_name and phone_number columns.
    public function up()
    {
        Schema::create('patients', function (Blueprint $table) {
            $table->bigIncrements('id');
            $table->string('first_name');
            $table->string('last_name');
            $table->string('phone_number');
            $table->timestamps();
        });
    }
You can check the various options available in Laravel Docs
You will also need to update the Patient Model with these Fields using $fillable property.
protected $fillable = ['first_name', 'last_name', 'phone_number'];
You can read more about this in Laravel Docs
Step 6: Now we are ready to run the migration. Running the migration will create all the migrations defined in the /database/migrations Folder. Run the migration using the following command
php artisan migrate
Open up your DB, you will see the patients table created. Remember the 2 Migrations File that we mentioned in Step 4 which were already present in the migration Folder, they also ran and created the users table and password_reset table. In addition, Laravel also created migrations table which it refers internally to keep track of all the migrations.
Step 7: Now we will update the routes/api.php to handle various Routes that we will be exposing via our API
	Route::get('patients', 'PatientController@index');
	Route::get('patients/{patient}', 'PatientController@show');
	Route::post('patients', 'PatientController@store');
	Route::put('patients/{patient}', 'PatientController@update');
	Route::delete('patients/{id}', 'PatientController@destroy);
The Routes follow the basic API Rules.
GET is for retrieving the Resource
POST is for creating the Resource
PUT is for updating the Resource
DELETE is for deleting the Resource
Patient represents the Resource in our case.
Step 8: Now we need to update the Controller to handle the functionality defined in the routes. You will see that all the methods have already been defined in our PatientController when we created this via Artisan in Step 4. We just need to update all these methods using below straightforward code
class PatientController extends Controller
{
    /**
     * Display a listing of the resource.

     * @return \Illuminate\Http\Response
     */
    public function index()
    {
        //
        return Patient::all();
    }

    /**
     * Store a newly created resource in storage.

     * @param  \Illuminate\Http\Request  $request
     * @return \Illuminate\Http\Response
     */
    public function store(Request $request)
    {
        //
        $patient = Patient::create($request->all());
        return response()->json($patient, 200);
    }

    /**
     * Display the specified resource.

     * @param  \App\Patient  $patient
     * @return \Illuminate\Http\Response
     */
    public function show(Patient $patient)
    {
        //
    	return $patient;
    }


    /**
     * Update the specified resource in storage.

     * @param  \Illuminate\Http\Request  $request
     * @param  \App\Patient  $patient
     * @return \Illuminate\Http\Response
     */
    public function update(Request $request, Patient $patient)
    {
        //
        $patient->update($request->all());
        return response()->json($patient, 200);
    }

    /**
     * Remove the specified resource from storage.

     * @param  \App\Patient  $patient
     * @return \Illuminate\Http\Response
     */
    public function destroy(Patient $patient)
    {
        //
        $patient->delete();

        return response()->json(null, 204);
    }
}
Step 9: We always want our API to return JSON Response even in case of Error or 404. So we update the app/exceptions/Handler.php
use Illuminate\Auth\AuthenticationException;
use Symfony\Component\HttpKernel\Exception\UnauthorizedHttpException;
.
.
.
.
    public function render($request, Exception $exception)
    {
	   if ($exception instanceof ModelNotFoundException && $request->wantsJson()) {
		return response()->json([
	            'data' => 'Resource not found'
	        ], 404);
	    }

	    if($exception instanceof UnauthorizedHttpException) {
	      	return response()->json(['error' => 'Unauthenticated.'], 401);
	    }
            return parent::render($request, $exception);
    }

    protected function unauthenticated($request, AuthenticationException $exception)
    {
	return response()->json(['error' => 'Unauthenticated.'], 401);
    }
We also comment everything inside redirectTo function in /app/Http/MiddlewareAuthenticate.php.
Step 10: Now we need to Manually Insert Data into our Patient Model. Laravel provides seeder to insert the data into a table, but for the sake of convenience you can manually insert 3 to 4 records using phpMyAdmin
Step 11: At this stage, we are ready to Test our API. We can only Test GET Calls at this stage. We will need to install CORS to Test other Calls, which we will do at a later stage of this tutorial.
Step 12: Go ahead and Start the Server using the following command line
php artisan serve
Now open the following URLs in your browser
http://127.0.0.1:8000/api/patients/
This will give you a JSON Response with all the Patients in your DB. This Route goes to PatientController::index()
http://127.0.0.1:8000/api/patients/1
This will retrieve the Patient with id = 1. This Route corresponds to PatientController::show()
In order to make PUT, POST and DELETE Request work, we will need to install CORS. Also our REST API is exposed to all unauthenticated Users. In the following part of the tutorial we will make it accessible to only Authenticated Users using JWT Token.
Step 13: Install JWT using the following command
composer require tymon/jwt-auth "1.0.*"
Publish the JWT Config File using the following command
php artisan vendor:publish --provider="Tymon\JWTAuth\Providers\LaravelServiceProvider"
Run following command. This will update .env
php artisan jwt:secret
Update config/app.php with JWTAuth Class Constant.
'JWTAuth' => Tymon\JWTAuth\Facades\JWTAuth::class,
Update config/auth.php. We need to update Guards for api so that it uses jwt
        'api' => [
            'driver' => 'jwt',
            'provider' => 'users',
            //'hash' => false,
        ],
Step 14: We update the User Model so that it implements JWTSubject
use Tymon\JWTAuth\Contracts\JWTSubject;

class User extends Authenticatable implements JWTSubject
.
.
.
    public function getJWTIdentifier()
    {
        return $this->getKey();
    }

    public function getJWTCustomClaims()
    {
        return [];
    }

    public function setPasswordAttribute($password)
    {
        if ( !empty($password) ) {
            $this->attributes['password'] = bcrypt($password);

    }
Step 15: Create Auth Controller using following command
php artisan make:controller AuthController
Step 16: Create routes in api.php for register, login and logout
Route::post('/register', 'AuthController@register');
Route::post('/login', 'AuthController@login');
Route::post('/logout', 'AuthController@logout');
Step 17: We update our AuthController to handle the above routes. Basically register and login method will return you JWT Token and logout will destroy the Token.
namespace App\Http\Controllers;

use Illuminate\Http\Request;
use App\User;
use JWTAuth;

class AuthController extends Controller
{
    //

    public function register(Request $request)
    {

	 $user = User::create([
             'name'    => $request->name,
			 'email'    => $request->email,
             'password' => $request->password,
         ]);

        //$token = auth()->login($user);
        $token = JWTAuth::fromUser($user);

        return $this->respondWithToken($token);
    }

    public function login()
    {
        $credentials = request(['email', 'password']);

        if (! $token = JWTAuth::attempt($credentials)) {
            return response()->json(['error' => 'Unauthorized'], 401);


        return $this->respondWithToken($token);
    }

    public function logout()
    {
        auth()->logout();

        return response()->json(['message' => 'Successfully logged out']);
    }

    protected function respondWithToken($token)
    {
        return response()->json([
            'access_token' => $token,
            'token_type'   => 'bearer',
            'expires_in'   => auth('api')->factory()->getTTL() * 60
        ]);
    }
}
Step 18: At this stage our Patient Routes are still accessible without Authentication.We need to guard it properly. Update /app/Kernel.php and introduce jwt.auth MiddlewareRoute
'jwt.auth' => 'Tymon\JWTAuth\Middleware\GetUserFromToken',
Now we update routes/api.php to protect Patient Routes using jwt.auth Middleware. These Routes will no longer be accessible without Authentication.
Route::group(['middleware' => [
		'jwt.auth',
	]], function() {
	Route::get('patients', 'PatientController@index');
	Route::get('patients/{patient}', 'PatientController@show');
	Route::post('patients', 'PatientController@store');
	Route::put('patients/{patient}', 'PatientController@update');
	Route::delete('patients/{id}', 'PatientController@destroy');
});
Step 19: At this stage our API is ready, we just need to avoid CORS Errors. So we install package using the following command
composer require barryvdh/laravel-cors
Also update /app/Kernel.php in the $middleware array
\Barryvdh\Cors\HandleCors::class,
Our API is now ready. Let us Test it. First Start the Server using the following command
php artisan serve
Now open POSTMAN, we will use this to Test Our API Calls.
Test Case 1: We will first test the Register Route.
URL: http://127.0.0.1:8000/api/register
Request Type: POST
We will register a User. We will need to supply name, email and password as JSON Body.
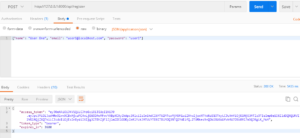
Above is the screenshot from PostMan. Our API Call is successfully. It return us the JWT Token which we will need to use in subsequent Request. If you check the User Table in your DB, it will have a row inserted with above user.
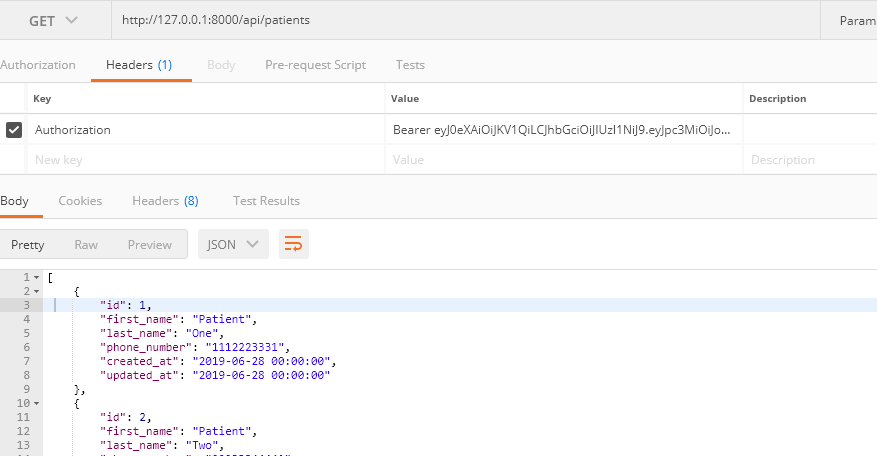
Test Case 2: Getting all Patients.
URL: http://127.0.0.1:8000/api/patients
Request Type: GET
We tested this in Step 12 without Auth. Go ahead and Test this in Postman.
It should return a 401 Unauthenticated Error. That is because we did not provided the Token.
Now go ahead and provide the Token along with Bearer as shown in the screenshot below
We will leave it to you test other scenarios like Add Patient, Edit Patient and Delete Patient.
You can also create other Models and build the API Endpoints for them. This provides you a strong base to develop a strong application ahead.
You can get the whole code on Github by clicking here.