When you join a team, you are provided with the Git Access and one of the first thing that you need to do is to set up the Project on your system. Alternatively, you might find an interesting project on Github and would like to play around with it by installing on your system. In this Tutorial, we will see how we can set up an existing Laravel Project on your system using Git.
1. Open Git Bash
First of all you need to do is open the Git Bash and go to the folder of your choice where you want to install the Project. This folder could be at any location inside XAMPP, WAMP or any other directory where you keep track of your projects.
2. Git Clone
Then we need to clone the project inside this directory. In order to clone the project, we need the Git URL. We can get the Git URL as shown in the below screenshot.
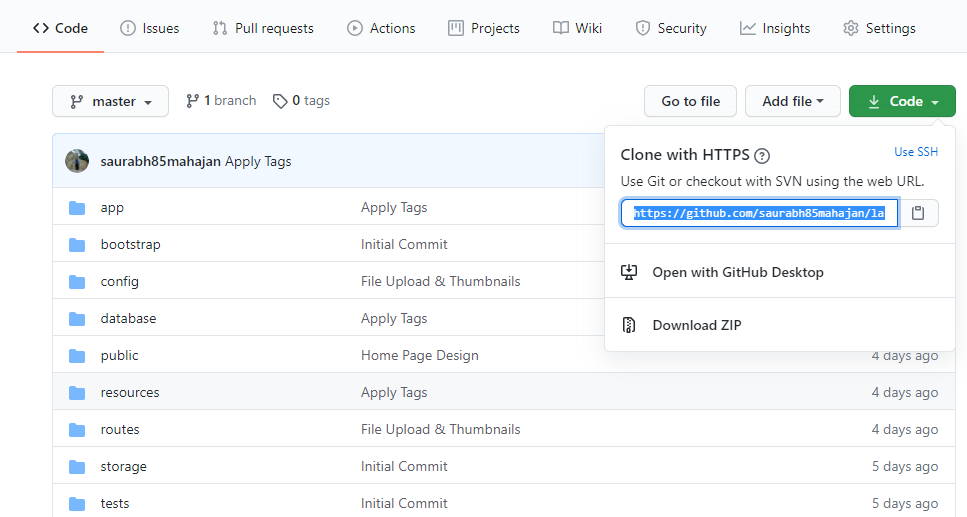
Once we have the URL, we can then use the below command in the terminal
git clone https://github.com/saurabh85mahajan/laravel_course.git awesome_project
Here awesome_project is the name of the folder that will be created in the directory that you are currently in. This folder will hold all of your Laravel Project. You can name this folder anything that you want.
3. Install Composer Dependencies
Once the command is finished, you will have all the code from Git inside your own folder. However, remember that Git does not contain any of the Vendor or external Library Files. There is only a reference to the Third Party Extensions and their Version being used in the project. This information is present in the composer.json file. So all these composer dependencies needs to be installed. In order to install them, you need to go inside the Project Directory.
cd awesome_project
Once inside, you can install composer dependencies using below command
composer install
This will install all the Project Dependencies including the Laravel Framework itself.
4. Install NPM Packages
Similar to installing composer dependencies, you also need to install NPM Packages. So for that you need to run following command
npm install
5. Create Database
Now that our project and all the dependencies are completely installed, we need to connect to the Database to get our project running. We will create the Database on your system. You can use a Tool like phpMyAdmin to create the Database.
6. Create .env File
Once the Database has been created, we will need to tell Laravel to connect to this Database. This information goes into .env File located at the root of your project. However, as you will see that your project does not have any .env file. This is because of the security reasons. Since your .env file contains sensitive information, it is not committed to git. However, you do have .env.example which is the duplicate of your .env file without any sensitive information. So we will create .env file using this file. We can do so using below command
cp .env.example .env
Now within this file you can enter all the Database Information to connect to the DB.
5. Generate Key
Now there are a few things that you will need to do before your Laravel project is up and running. We will use Artisan CLI to accopmplish these tasks. First of all you need to generate a key. This key is stored in the .env file itself and is used byLaravel to encrypt various parts of your application. You can generate the key using below command
php artisan key:generate
8. Create Symlink
If your application is allowing user to upload media files, you will need to generate a symlink. This step is optional and might not be required for your project. However, if you are not sure you can still go ahead with the below command
php artisan storage:link
9. Run Migration
Next step that we need to do is to run the migration. Your migration files holds your DB Schema and we can run them using following command
php artisan migrate
This will create all the necessary Tables in the DB which you specified in the .env file previously.
10. Run Seeder
There might be some Tables which holds the values which are necessary to run your project. Such tables are populated using Seeder. You can run the seeder using below command
php artisan db:seed
11. Running Factories
This step is again optional and you only need to run them if you want dummy data to initially play around with the system. You can run factories using tinker.
php artisan tinker
After that you could run available factories in the system. For eg. following command would create 1 User in the system
factory(App\User::class)->create()
If you want to create 5 users, you could run below command
factory(App\User::class, 5 )->create()
If you are running Laravel 8 or above, Factories are now Class based so above code will be written as
App\User::factory()->create();
If you want to create multiple records, you can use the count method and specify the number of records to be created as parameter.
App\User::factory()->count(5)->create();
12. Running your Project.
Finally you can run start the development server by running the following command.
php artisan serve
Now you should be able to access your project at http://127.0.0.1:8000.
Hope you have good understanding of how to install the Laravel Project using Git. Some of the projects might have some additional steps, they would usually be documented in the readme File. However, all of the projects will have the above basic steps required to be followed in the specific order. If you would like to see the Video Version of this Tutorial, you can view the Video in our YouTube Channel.